These are the step-by-step directions to create a CMS grid in all the variations you like
Step 1: Make Default Grid
- Add section
- Add container
- Add collection list (in purple)
- Attach it to your main CMS collection
- Insert Link Box
- Insert image, attach it to collection image, style as wished
- Insert header, attache it to collection title
- Insert paragraph, attach it to collection blurb
- Beneath it add a flex box
- Add 2 buttons
- Make first button a link to the CMS category
- Make the second button link to the current article
- Set flexbox top margin to Auto
- Click on Link Box,
- remove formatting to get rid of underlines
- Give 5 point radius
- Click on hover, add shadow or color
- Click on collection item
- Make border
- Give rounded edges
- MAKE THE CARDS A NORMAL SIZE AND BEHAVIOR PETER PLEASE NOTE THIS TOOK YOU MANY HOURS TO FIGURE OUT IT'S A PRECIOIUS THOUGHT
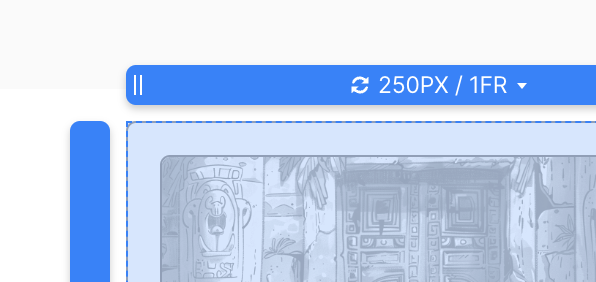
- CLICK collection list in navigator
- CLICK "grid" in style panel on right
- SET to 1 row, 1 column
- Click on blue squares thing in top
- click on blue rectangle
- set min/max to auto (its a checkbox)


- Click on collection list
- Click settings
- Set #items

Step 2: Make New Grid
- Copy the grid above
- Rename ALL components you want to differ from the previous ones
- Go into collection item
- Unlink all items from underlying cms collection
- Go to collection list
- Select new CMS collection
- Go back to collection item, attach to the new variables